
The right mounting hardware keeps voiceover panels secure without compromising wall access, panel placement, or studio appearance. This roundup compares 10 options ranging from push-on impalers to no-drill hooks and heavy-duty clips.
Use the buying guide below to match the clip style, load capacity, installation method, and panel design to your recording space.
Best 10 Acoustic Panel Mounting Clips for Voiceover Picks for 2026
Best Overall
Six-Prong Surface Mount Impaler Clips

- Six prongs provide a secure panel hold
- Galvanized steel resists corrosion and deformation
- Available in 12-, 24-, and 36-piece packs
Best For: Heavier acoustic panels in studios and home theaters
Best for Structural Isolation
Resilient Channel Sound Isolation Clips

- Helps isolate wall and ceiling vibrations
- Uses durable metal and resilient damping elements
- Compatible with wood or metal furring
Best For: Voiceover-room construction and resilient-channel systems
Best Drill-Free Option
Slim Black Acoustic Wall Clips
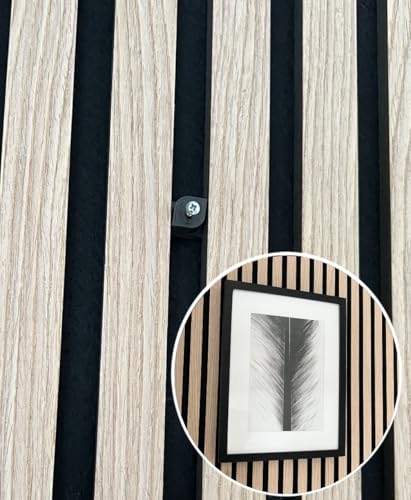
- Installs without drilling
- Reusable for flexible panel placement
- Supports up to 3 kg per stated recommendation
Best For: Lightweight slatted panels and frequently changing layouts
Best for Large Installations
25-Piece Galvanized Impaling Clips

- Includes 25 clips for broader coverage
- 18-gauge galvanized steel construction
- Works with gypsum board, plywood, and masonry
Best For: Large, continuous acoustic panel installations
Studio Isolation Foundation

- 20 clips for broad wall or ceiling projects
- Steel-and-rubber design helps limit sound bridges
- Works with wood or steel framing
Best For: Larger home-studio and recording-studio isolation projects
Flexible Panel Placement

- 25 galvanized-steel panel clips
- Push-on installation for quick setup
- Compatible with gypsum, plywood, and masonry
Best For: Multi-panel voiceover and acoustic-treatment layouts
Best Heavy-Duty Coverage
Hicarer 36-Pack Impaling Clips

- 36 clips plus screws and expansion screws
- Galvanized steel with six hardened claws
- Suitable for multiple wall surfaces
Best For: Large studio and home-theater installations
Best for Slat Panels
Extra-Strong Black Metal Clips

- Fits 12–17 mm slat spacing
- Durable metal construction
- Includes four M4 screws
Best For: Small voiceover rooms with compatible wood slat panels
Best No-Drill Option

- Snap-on installation without drilling or glue
- Fits 13–15 mm panels
- Rust-resistant metal construction
Best For: Grooved slat walls and damage-conscious installations
Best Overall – Six-Prong Surface Mount Impaler Clips
These galvanized-steel impaling clips are a practical choice when you need acoustic panel mounting clips for voiceover rooms, studios, or home theaters. The triangular surface-mount design uses a top screw hole for positioning, then the panel is pushed onto six protruding anchor points.
Best For: Securely mounting heavier acoustic panels in recording studios, home theaters, offices, and similar spaces.
Pros:
- Six extended prongs help hold acoustic panels securely.
- Galvanized steel resists rust, corrosion, and deformation.
- Includes 12 clips, with 24- and 36-piece package options also available.
Cons:
- Requires drilling and screws to attach the clips to the wall.
- The large 4.6-by-3.9-inch triangular footprint may not suit every panel layout.
For voiceover treatment projects where a firm, durable attachment matters more than a drill-free installation, this is a well-rounded mounting option.
Best for Structural Isolation – Resilient Channel Sound Isolation Clips
These sound isolation clips are intended for wall and ceiling soundproofing systems rather than simple panel hanging. For a voiceover booth or studio build, they help mount steel furring channels while using resilient damping elements to reduce vibration transmission.
Best For: Construction or renovation projects involving resilient channels, framed walls, ceilings, studios, and office partitions.
Pros:
- Designed to help reduce airborne and impact noise transmission.
- Durable metal components and resilient damping elements resist wear and deformation.
- Works with wood or metal furring in walls and ceilings.
Cons:
- More involved to install than surface-mounted panel clips.
- Screws are not included.
- A 10-pack may be insufficient for larger wall or ceiling systems.
This set makes the most sense when you are building an isolation assembly for a voiceover space, not when you simply need to attach finished acoustic panels.
Best Drill-Free Option – Slim Black Acoustic Wall Clips
These compact plastic clips offer a drill-free way to hang compatible slatted acoustic wall panels. For voiceover setups that use panels with slat spacing of at least 13 mm, they attach with a flat screwdriver and can be repositioned without damaging the panel.
Best For: Lightweight acoustic wall panels, artwork, and photos in flexible studio or room layouts.
Pros:
- No drill is required for installation.
- Reusable and portable for changing panel or decoration placement.
- Slim black design supports up to 3 kg and stays unobtrusive.
Cons:
- Limited to panels with slat spacing of 13 mm or more.
- Maximum recommended load is 3 kg.
- The four-piece pack is less suited to larger installations.
Choose these when preserving the wall and repositioning lightweight slatted panels are priorities; they are not the right fit for heavy, solid acoustic panels.
Best for Large Installations – 25-Piece Galvanized Impaling Clips
This 25-piece set is a useful option when you need acoustic panel mounting clips for voiceover treatment across a larger wall area. The 18-gauge galvanized-steel fixtures use a push-on installation method and include three screw holes per clip for stable attachment.
Best For: Expansive acoustic surfaces in conference rooms, theaters, and voiceover or recording spaces.
Pros:
- 25 clips provide coverage for broader panel installations.
- Galvanized 18-gauge steel offers wear and corrosion resistance.
- Compatible with gypsum board, plywood, and masonry.
- Supports seamless splicing of acoustic panels.
Cons:
- Installation still requires screws and suitable wall anchors or fastening methods.
- The approximately 4.7-by-2-inch clips may require careful panel positioning.
- Push-on mounting may be less convenient if panels need frequent removal.
With its larger quantity and multiple screw holes, this set is particularly practical for treating multiple panels or creating a broad, continuous acoustic surface.
Studio Isolation Foundation – 20-Pack Sound Isolation Clips
For voiceover rooms that need broader wall or ceiling treatment, these acoustic panel mounting clips for voiceover provide a 20-piece sound-isolation hardware set. Steel construction and rubber components are designed to help reduce sound bridges when used with compatible channels.
Best For: Home studios, recording studios, apartments, and larger wall or ceiling sound-isolation projects.
Pros:
- 20-piece set suits larger areas or multiple rooms.
- Steel and rubber construction supports decoupling.
- Compatible with wooden or steel framing and several wall materials.
- Designed for 7/8 x 1.25-inch standard cover plate and keel channel steel.
Cons:
- These are sound-isolation clips rather than a complete acoustic-panel mounting kit.
- Installation requires compatible channel hardware and fastening materials.
This is the most suitable option here when your voiceover setup calls for structural isolation across walls or ceilings, rather than a small, tool-free panel hanging solution. Confirm channel compatibility before ordering.
Flexible Panel Placement – Blulu 25-Piece Impaling Clips
These acoustic panel mounting clips for voiceover are intended for quick push-on installation of acoustic panels. The 25-piece galvanized-steel set supports seamless panel layouts and is designed for use with gypsum board, plywood, and masonry.
Best For: Voiceover booths, conference rooms, theaters, and projects requiring multiple acoustic panels across varied wall surfaces.
Pros:
- 25 clips provide coverage for multiple panels.
- Push-on design avoids complicated adhesive installation.
- Galvanized 18-gauge steel offers wear and corrosion resistance.
- Designed for seamless splicing across expansive acoustic surfaces.
Cons:
- The product notes do not specify a supported panel weight.
- Installation still requires attention to the included screw-hole dimensions and wall substrate.
Choose this set when a clean, repeatable panel layout matters in a voiceover space. Its larger quantity and broad substrate compatibility make it more practical for multi-panel treatment than for a single small installation.
Tool-Free Panel Hanging – Metal Acoustic Wall Hooks
For lighter, repositionable installations, these acoustic panel mounting clips for voiceover offer a no-drill approach. The metal hooks use an included plastic key for installation and can be repositioned without requiring other tools.
Best For: Smaller acoustic wall panels, wood slat panels, artwork, and voiceover spaces where wall damage and easy repositioning are priorities.
Pros:
- No drilling or additional tools are required.
- All-metal construction is more durable than a 3D-printed plastic alternative.
- Clips can be repositioned and reinstalled multiple times.
- Rated to support up to 5 kg.
Cons:
- Only six hooks are included per box.
- The stated 5 kg maximum requires staying within the supported load.
- Not intended as a full structural sound-isolation system.
This is the convenient choice for renters or voiceover users who want to hang and adjust panels without drilling. Check each panel’s weight and mounting compatibility before relying on the hooks for a larger installation.
Best Heavy-Duty Coverage – Hicarer 36-Pack Impaling Clips
For larger voiceover rooms or studio projects, these acoustic panel mounting clips for voiceover provide a substantial supply of triangular push-on impalers. The galvanized-steel clips include screws and expansion screws, making them suitable for mounting sound-absorbing panels on gypsum board, plywood, or brick.
Best For: Large-area installations, recording studios, home theaters, and DIY users who want a complete hardware kit.
Pros:
- 36 clips with 108 screws and 108 expansion screws support multiple panels.
- Six hardened-steel claws are designed to grip heavier sound-absorbing panels.
- Triangular positioning and push-in installation help simplify alignment.
- Creates an air gap that may support improved mid-to-low-frequency absorption.
Cons:
- The impaler design punctures the panel, so it is less suitable for installations requiring no panel damage.
- The large pack may be more hardware than needed for a small voiceover setup.
This is the most versatile option here for outfitting several panels at once. Its included fasteners and corrosion-resistant steel construction make it a practical choice when quantity and firm panel retention matter.
Best for Slat Panels – Extra-Strong Black Metal Clips
These acoustic panel mounting clips for voiceover are designed for wood acoustic panels with 12–17 mm slat spacing. The compact black metal clips attach by rotating with a flathead screwdriver and include M4 screws for a straightforward installation.
Best For: Small voiceover or podcast spaces using wood slat acoustic panels with compatible spacing.
Pros:
- Strong metal construction offers greater stability than plastic alternatives.
- Fits slat spacing from 0.47 to 0.67 inches.
- Includes four M4 screws and requires no additional specialized tools.
- Black finish can blend with many dark acoustic-panel designs.
Cons:
- The four-clip pack is limited for mounting several panels.
- Compatibility depends on having 12–17 mm slat spacing.
This focused kit makes sense when you need only a few sturdy attachment points for compatible slat-wall panels. Check the panel spacing before ordering, since its fit range is narrower than universal mounting hardware.
Best No-Drill Option – MOROBOR 10-Pack Panel Clips
For renters or finished rooms, these acoustic panel mounting clips for voiceover use a groove snap-on design rather than drilling or glue. They are made for 13–15 mm sound-insulation boards and grooved wood slat walls, offering a quick way to mount compatible panels.
Best For: Podcast rooms, home offices, bedrooms, and studios with 13–15 mm panels and grooved slat walls.
Pros:
- No-drill installation helps avoid scratching walls or sound boards.
- Ten clips provide enough hardware for multiple panels.
- Rust-resistant metal construction supports long-term hanging use.
- Designed to snap into compatible wall grooves without glue.
Cons:
- Compatibility is limited to panels around 13–15 mm thick.
- Requires a grooved wood slat wall for the snap-on mounting method.
- It is not the best choice for flat walls without compatible grooves.
This is the most convenient choice when preserving the wall and panel surfaces is a priority. Its no-drill design is appealing for temporary or low-mess installations, provided your panel thickness and slat-wall grooves match.
How We Picked the Best Acoustic Panel Mounting Clips for Voiceover
We focused on mounting hardware that can support common acoustic panels in home voiceover booths, podcast rooms, and recording studios. The comparison considers attachment style, included screws or hooks, material, pack size, installation requirements, and compatibility with different panel frames or backings.
Because panel construction varies widely, no single clip is ideal for every installation. Push-on impalers generally provide strong surface mounting, while no-drill and hook-style designs can be more convenient for lighter panels or rental spaces. We also looked for products that offer enough hardware for practical multi-panel installations rather than one-off repairs.
Quick Comparison
| Clip Type | Best For | Main Advantage | Watch For |
|---|---|---|---|
| Push-on impalers | Framed or rigid acoustic panels | Strong, secure wall attachment | Requires accurate placement and usually screws |
| Heavy-duty metal clips | Heavier panels and permanent studios | Durability and higher confidence under load | May need suitable anchors or pilot holes |
| No-drill hooks | Renters and lighter panels | Less wall damage and simpler installation | Lower load capacity and surface limitations |
| Sound-isolation clips | Specialized wall or ceiling assemblies | Useful in resilient-channel systems | Not always a direct substitute for panel hangers |
Key Buying Factors for Acoustic Panel Mounting Clips for Voiceover
Panel Weight and Construction
Check the panel’s actual weight, backing material, and frame design before choosing hardware. Six-prong impalers and metal mounting clips are typically better suited to rigid or heavier panels, while plastic hooks may work for lightweight decorative absorbers.
Wall Type and Installation Method
Drywall, wood studs, masonry, and slat-wall surfaces require different fasteners. Confirm whether the package includes appropriate screws and whether wall anchors are needed. For rental rooms, prioritize no-drill solutions only when their stated capacity is adequate and the wall surface is compatible.
Placement and Removal
Voiceover panels often need precise positioning around the microphone and performer. Choose hardware that allows repeatable alignment and, when possible, straightforward panel removal for cable access or room changes.
Pack Size and Coverage
Count the clips required per panel before buying. Larger packs can reduce the per-panel cost, but only if the hardware matches your panel design. Extra screws are useful for replacements, while incompatible fasteners add little value.
Who Should Buy Which Acoustic Panel Mounting Clips for Voiceover?
Choose push-on impalers for a conventional studio installation where secure, flush mounting matters. Select heavy-duty metal clips for heavier panels or a permanent voiceover room. No-drill hooks are the most practical choice for renters, temporary setups, and lightweight acoustic products. Sound-isolation clips make sense when they are part of a broader resilient-channel or wall-assembly project, but they should not be confused with ordinary panel-hanging hardware.
Before installation, test one panel in an inconspicuous area, verify the fastener’s load rating, and leave enough clearance around the microphone, door, ventilation, and electrical equipment. Proper mounting improves safety and positioning, but it works best alongside suitable panel coverage and careful room treatment.